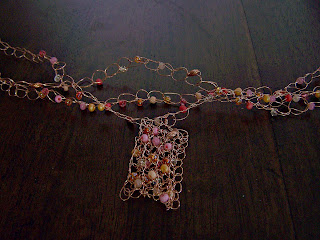
Crocheting wire is just like crocheting yarn, it's just a different material! If you already know how to crochet, then this necklace will be a breeze for you!! If not, hopefully the instructions {and pictures}will help you, so that you can make your own necklace!!
First, you need to make sure you have all of your supplies!
Wire--26 or 28 gauge works best {I used copper wire}
Clasp {I used copper}
Assortment of beads
Crochet Hook--size I
Pendant {I used a crocheted one that I had previously made}
Lay out 30 beads in whatever order you'd like. I just did it random.
Unwind about 2 feet of wire and string all of the beads onto your wire. {The wire will still be connected to the spool. DON'T cut it yet!}
Once all of the beads are on, leave about a 5 inch tail and make a loop by twisting the wire.
Get ready to start crocheting by putting the hook through the loop. Hold the tail of the wire with your thumb, ring finger, and pinkie. Hold the wire that is connected to the spool in between your first and middle finger.
To make a crocheted chain, grab the wire with the hook and pull through the loop.
For this necklace, chain 14 times.
It should look like this!
Now it is time to start adding the beads into the chains. Do this by pulling 1 bead down to the previous chain, and then pull the wire through the loop with the hook. This will capture the bead into the chain.
Do that with all 30 beads, and it should end up looking like this.
Then, make 14 more empty chain stitches like you did before. Cut the wire, leaving a 5 inch tail, then chain one more time pulling the wire through the last chain.
Now you are done with your first strand!!
This necklace is made up of 3 strands. So repeat the previous steps 3 times!! For the other two strands I only used 15 beads and then did and empty chain in between each bead. Also for the pendant, just count it as one of the beads, but make sure to string it in the center!
When you have all three strands completed, lay them all out together.
Twist the three ends together,
and then start braiding the three strands.
Keep braiding until you get to the end,
and then twist the other three ends together.
Make a wire-wrapped loop on each end with round nose pliers, and attach the clasp.
{I will do a video tutorial on making wire-wrapped loops in the future!}
And now you are done, and have a fun new piece of jewelry to wear!!
Enjoy!!
I hope that this tutorial made sense! It was a lot more difficult to try and explain with pictures than I thought it would be! Hope your weekend is going great!!
~mariah~


2 comments:
This looks great!!
I've awarded you the Liebster blog award come over and claim it - http://serenityyou.blogspot.com/2012/03/ive-been-awarded-liebster-blog-award.html
Natasha xxx
Hello, I love reading through your blog, I wanted to leave a little comment to support you and wish you a good continuation. Wish you best of luck for all your best efforts. copper wire manufacturers, commercial led lighting.
Post a Comment