Sunday, March 11, 2012

Menu Board

I pinned this cute menu board on Pinterest awhile ago, and knew it would be something that would be a huge help with the "what's for dinner" issue!


So, I was V.E.R.Y. excited to go to a craft night to make my very own menu board!!  It was really easy to make!  We just used an 11x14" picture frame with scrapbooking paper inside.  Then we hot glued clothes pins and the wooden box to the frame, and embellished it to fit our style.  Then finished it off with personalized vinyl!  I L.O.V.E. it!!


How does it work, you ask.  Well, print out meal cards with the recipe on one side and a shopping list for the meal on the other.  Store all of your meal cards in the box, and each week choose what you want to for dinner and put the cards in the clothes pins.  Then go grocery shopping for all of the ingredients you need for that week's meals! 


My meal cards aren't finished yet, but I think this is going to be life changing in our home!! I am so excited to use my cute menu board! 

Side Note:  Do you like the flowered scrapbooking paper?  I A.D.O.R.E. it, and am going to use it as my inspiration for the color scheme of my new kitchen/dining room/living room area!! {they are all connected!}

Do you plan out all of your meals ahead of time, or wait until 4 or 5 o'clock to figure out "what's for dinner?" like I used to?


~mariah~

Tuesday, March 6, 2012

Terrific Tuesday {6} & Features!

Woohoo!  I had 11 link ups this last week, so I can do some features!!  Thanks to everyone who linked up!!  I loved ALL of the things you linked up, but these are the ones that really caught my eye!
Blissful & Domestic shared some great tips on how to save hundreds of dollars on your grocery bill!


Serenity You shared these fun homemade notebooks!


And GingerSnap Crafts shared this easy and super cute St. Patty's Day craft!


Let's beat last week's number and link up more than 11 this week!!


Have a great day!!


~mariah~

Sunday, March 4, 2012

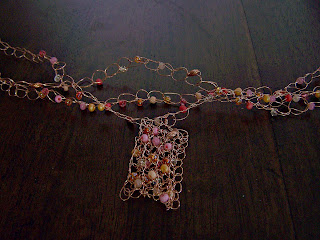
Crocheted Copper Necklace {tutorial}

Today I had the itch to create something, and have been wanting to make some kind of jewelry lately, so I decided that is what I'd do today!  I love making crocheted wire jewelry, and had made a crocheted pendant, but never made a necklace to go with it, so that is the project I decided to tackle!!
Crocheting wire is just like crocheting yarn, it's just a different material!  If you already know how to crochet, then this necklace will be a breeze for you!! If not, hopefully the instructions {and pictures}will help you, so that you can make your own necklace!!

First, you need to make sure you have all of your supplies!


Wire--26 or 28 gauge works best {I used copper wire}
Clasp {I used copper}
Assortment of beads
Crochet Hook--size I
Pendant {I used a crocheted one that I had previously made}


Lay out 30 beads in whatever order you'd like. I just did it random.

Unwind about 2 feet of wire and string all of the beads onto your wire.  {The wire will still be connected to the spool. DON'T cut it yet!}


Once all of the beads are on, leave about a 5 inch tail and make a loop by twisting the wire.


Get ready to start crocheting by putting the hook through the loop.  Hold the tail of the wire with your thumb, ring finger, and pinkie.  Hold the wire that is connected to the spool in between your first and middle finger.

To make a crocheted chain, grab the wire with the hook and pull through the loop.

For this necklace, chain 14 times.


It should look like this!

Now it is time to start adding the beads into the chains.  Do this by pulling 1 bead down to the previous chain, and then pull the wire through the loop with the hook.  This will capture the bead into the chain.

Do that with all 30 beads, and it should end up looking like this.

Then, make 14 more empty chain stitches like you did before.  Cut the wire, leaving a 5 inch tail, then chain one more time pulling the wire through the last chain.

Now you are done with your first strand!!


This necklace is made up of 3 strands. So repeat the previous steps 3 times!! For the other two strands I only used 15 beads and then did and empty chain in between each bead.  Also for the pendant, just count it as one of the beads, but make sure to string it in the center!

When you have all three strands completed, lay them all out together. 


Twist the three ends together,

and then start braiding the three strands.

Keep braiding until you get to the end,

and then twist the other three ends together.

Make a wire-wrapped loop on each end with round nose pliers, and attach the clasp.
{I will do a video tutorial on making wire-wrapped loops in the future!}

And now you are done, and have a fun new piece of jewelry to wear!!
Enjoy!!


I hope that this tutorial made sense!  It was a lot more difficult to try and explain with pictures than I thought it would be!  Hope your weekend is going great!!

~mariah~

Thursday, March 1, 2012

Thrifty Finds Thursday {3}

I went to D.I. last week just for fun, and wasn't really planning on buying much, if anything at all. BUT, I just kept finding good things and ended up with a cart full of goods!!


Have you found any good thrifty finds lately? 

~mariah~

Tuesday, February 28, 2012

Terrific Tuesday {5}

Hello friends!! I hope you are having a good Tuesday!! It's time for another P.A.R.T.Y.!!!  So I really want to start featuring some of the link ups, BUT I need to have at least 10 links so I can choose!! SO link up, and spread the word that we are partying over here at Mariah's Creations!!!!


~mariah~

Monday, February 27, 2012

The Military Wife

The Military Wife
I wear no uniforms, no blues or greens.

But, I am in the military, in the ranks rarely seen.

I have no rank upon my shoulders. Salutes I do not give.

But in the military world is where I live.

... I am not in the chain of command, orders I do not give or get.

... But my husband is the one who does, this I can not forget.

I am not the one who fires a weapon, Who puts his life on the line.

But my job is just as tough, I’m the one who is always left behind.

My husband is a patriot, a brave and pride filled man.

And the call to serve his country not all can understand.

Behind the lines, I see things needed to keep this country free.

My husband makes the sacrifice, but so do my kids and me.

I love the man I married. The military is his life.

So I pledge to support my hero and stand among the silent ranks known as THE MILITARY WIFE.
 
 
~mariah~

I Recieved the Liebster Award!!!!


I am so honored to receive this award from Misty @ 413 {sparrow} Lane!
Check her out at http://www.413sparrowlane.com/
I AM SO EXCITED ABOUT THIS!!!!!  THANK YOU SO MUCH!!

Liebster is German and means 'dearest' or 'beloved', but it can also mean 'favorite'.

What is a Liebster Award?

The idea of the Leibster Award is to bring attention to blogs with less than 200 followers. So, in the spirit of good fun I am passing this award on to these other new bloggers. Please stop by and visit them.

If you are selected for this award, you need to:

1. Choose FIVE up and coming blogs to award the Liebster to.
Blogs must have less than 200 followers.

2. Show your thanks to the blogger who gave you the award by linking back to them.

3. Post the award on your blog. List the bloggers you are giving the award to with links to their sites.


I am happy to pass this award to :

1.  Cath @ Home Is Where My Heart Is for her great organization!
 http://cathhasablog.blogspot.com/

2.  Karen @ Homemade Glamour for being a fellow Sister Blogger!
http://homemadeglamour.blogspot.com/

3.  Rain on a Tin Roof for her amazing style and thrifty decor! 
http://rainonatinroof85.blogspot.com/

4.  Courtney @ Design on a Dream for her thrifty nature! 
http://designonadream.blogspot.com/

5.  Marilyn @ 4 You With Love for being so supportive, and consistently linking up to Terrific Tuesday!
http://4you-withlove.blogspot.com/

Happy Monday!!


~mariah~