Sunday, March 11, 2012

Menu Board

I pinned this cute menu board on Pinterest awhile ago, and knew it would be something that would be a huge help with the "what's for dinner" issue!


So, I was V.E.R.Y. excited to go to a craft night to make my very own menu board!!  It was really easy to make!  We just used an 11x14" picture frame with scrapbooking paper inside.  Then we hot glued clothes pins and the wooden box to the frame, and embellished it to fit our style.  Then finished it off with personalized vinyl!  I L.O.V.E. it!!


How does it work, you ask.  Well, print out meal cards with the recipe on one side and a shopping list for the meal on the other.  Store all of your meal cards in the box, and each week choose what you want to for dinner and put the cards in the clothes pins.  Then go grocery shopping for all of the ingredients you need for that week's meals! 


My meal cards aren't finished yet, but I think this is going to be life changing in our home!! I am so excited to use my cute menu board! 

Side Note:  Do you like the flowered scrapbooking paper?  I A.D.O.R.E. it, and am going to use it as my inspiration for the color scheme of my new kitchen/dining room/living room area!! {they are all connected!}

Do you plan out all of your meals ahead of time, or wait until 4 or 5 o'clock to figure out "what's for dinner?" like I used to?


~mariah~

Tuesday, March 6, 2012

Terrific Tuesday {6} & Features!

Woohoo!  I had 11 link ups this last week, so I can do some features!!  Thanks to everyone who linked up!!  I loved ALL of the things you linked up, but these are the ones that really caught my eye!
Blissful & Domestic shared some great tips on how to save hundreds of dollars on your grocery bill!


Serenity You shared these fun homemade notebooks!


And GingerSnap Crafts shared this easy and super cute St. Patty's Day craft!


Let's beat last week's number and link up more than 11 this week!!


Have a great day!!


~mariah~

Sunday, March 4, 2012

Crocheted Copper Necklace {tutorial}

Today I had the itch to create something, and have been wanting to make some kind of jewelry lately, so I decided that is what I'd do today!  I love making crocheted wire jewelry, and had made a crocheted pendant, but never made a necklace to go with it, so that is the project I decided to tackle!!
Crocheting wire is just like crocheting yarn, it's just a different material!  If you already know how to crochet, then this necklace will be a breeze for you!! If not, hopefully the instructions {and pictures}will help you, so that you can make your own necklace!!

First, you need to make sure you have all of your supplies!


Wire--26 or 28 gauge works best {I used copper wire}
Clasp {I used copper}
Assortment of beads
Crochet Hook--size I
Pendant {I used a crocheted one that I had previously made}


Lay out 30 beads in whatever order you'd like. I just did it random.

Unwind about 2 feet of wire and string all of the beads onto your wire.  {The wire will still be connected to the spool. DON'T cut it yet!}


Once all of the beads are on, leave about a 5 inch tail and make a loop by twisting the wire.


Get ready to start crocheting by putting the hook through the loop.  Hold the tail of the wire with your thumb, ring finger, and pinkie.  Hold the wire that is connected to the spool in between your first and middle finger.

To make a crocheted chain, grab the wire with the hook and pull through the loop.

For this necklace, chain 14 times.


It should look like this!

Now it is time to start adding the beads into the chains.  Do this by pulling 1 bead down to the previous chain, and then pull the wire through the loop with the hook.  This will capture the bead into the chain.

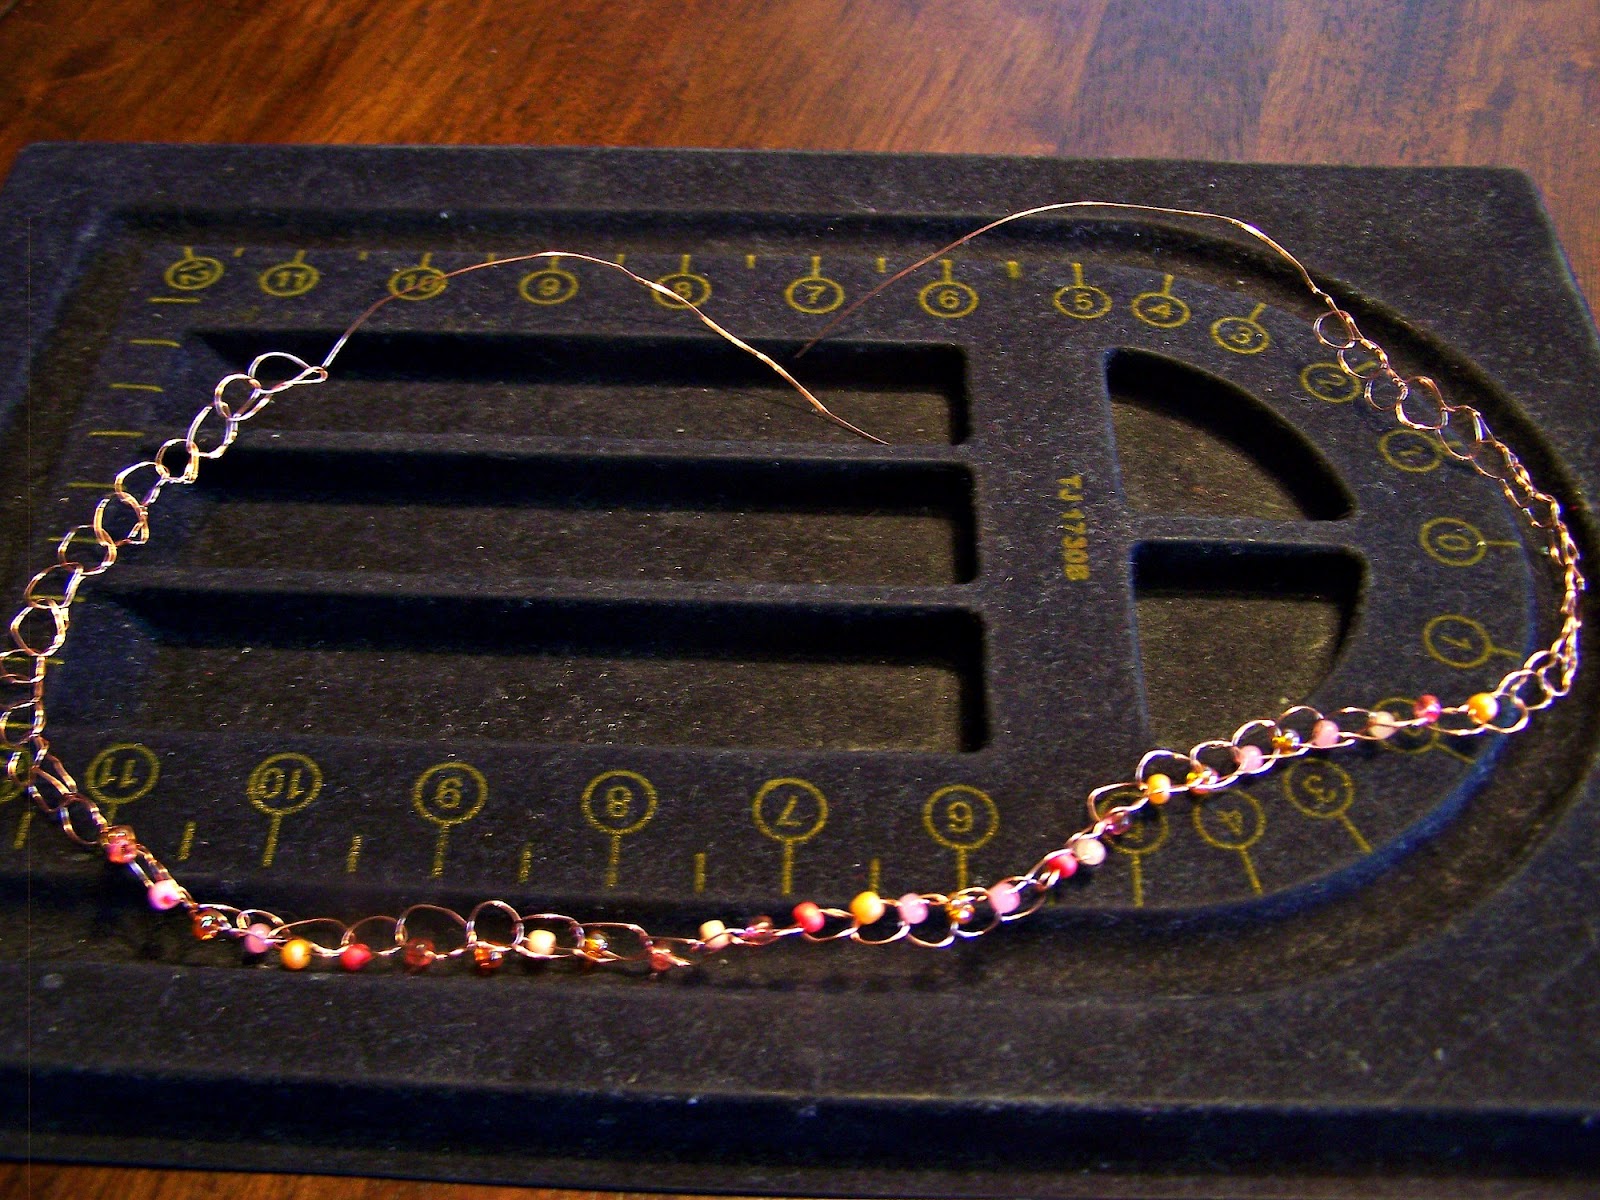
Do that with all 30 beads, and it should end up looking like this.

Then, make 14 more empty chain stitches like you did before.  Cut the wire, leaving a 5 inch tail, then chain one more time pulling the wire through the last chain.

Now you are done with your first strand!!


This necklace is made up of 3 strands. So repeat the previous steps 3 times!! For the other two strands I only used 15 beads and then did and empty chain in between each bead.  Also for the pendant, just count it as one of the beads, but make sure to string it in the center!

When you have all three strands completed, lay them all out together. 


Twist the three ends together,

and then start braiding the three strands.

Keep braiding until you get to the end,

and then twist the other three ends together.

Make a wire-wrapped loop on each end with round nose pliers, and attach the clasp.
{I will do a video tutorial on making wire-wrapped loops in the future!}

And now you are done, and have a fun new piece of jewelry to wear!!
Enjoy!!


I hope that this tutorial made sense!  It was a lot more difficult to try and explain with pictures than I thought it would be!  Hope your weekend is going great!!

~mariah~

Thursday, March 1, 2012

Thrifty Finds Thursday {3}

I went to D.I. last week just for fun, and wasn't really planning on buying much, if anything at all. BUT, I just kept finding good things and ended up with a cart full of goods!!


Have you found any good thrifty finds lately? 

~mariah~

Tuesday, February 28, 2012

Terrific Tuesday {5}

Hello friends!! I hope you are having a good Tuesday!! It's time for another P.A.R.T.Y.!!!  So I really want to start featuring some of the link ups, BUT I need to have at least 10 links so I can choose!! SO link up, and spread the word that we are partying over here at Mariah's Creations!!!!


~mariah~

Monday, February 27, 2012

The Military Wife

The Military Wife
I wear no uniforms, no blues or greens.

But, I am in the military, in the ranks rarely seen.

I have no rank upon my shoulders. Salutes I do not give.

But in the military world is where I live.

... I am not in the chain of command, orders I do not give or get.

... But my husband is the one who does, this I can not forget.

I am not the one who fires a weapon, Who puts his life on the line.

But my job is just as tough, I’m the one who is always left behind.

My husband is a patriot, a brave and pride filled man.

And the call to serve his country not all can understand.

Behind the lines, I see things needed to keep this country free.

My husband makes the sacrifice, but so do my kids and me.

I love the man I married. The military is his life.

So I pledge to support my hero and stand among the silent ranks known as THE MILITARY WIFE.
 
 
~mariah~

I Recieved the Liebster Award!!!!


I am so honored to receive this award from Misty @ 413 {sparrow} Lane!
Check her out at http://www.413sparrowlane.com/
I AM SO EXCITED ABOUT THIS!!!!!  THANK YOU SO MUCH!!

Liebster is German and means 'dearest' or 'beloved', but it can also mean 'favorite'.

What is a Liebster Award?

The idea of the Leibster Award is to bring attention to blogs with less than 200 followers. So, in the spirit of good fun I am passing this award on to these other new bloggers. Please stop by and visit them.

If you are selected for this award, you need to:

1. Choose FIVE up and coming blogs to award the Liebster to.
Blogs must have less than 200 followers.

2. Show your thanks to the blogger who gave you the award by linking back to them.

3. Post the award on your blog. List the bloggers you are giving the award to with links to their sites.


I am happy to pass this award to :

1.  Cath @ Home Is Where My Heart Is for her great organization!
 http://cathhasablog.blogspot.com/

2.  Karen @ Homemade Glamour for being a fellow Sister Blogger!
http://homemadeglamour.blogspot.com/

3.  Rain on a Tin Roof for her amazing style and thrifty decor! 
http://rainonatinroof85.blogspot.com/

4.  Courtney @ Design on a Dream for her thrifty nature! 
http://designonadream.blogspot.com/

5.  Marilyn @ 4 You With Love for being so supportive, and consistently linking up to Terrific Tuesday!
http://4you-withlove.blogspot.com/

Happy Monday!!


~mariah~

Friday, February 24, 2012

Felt Flower Wreath {tutorial}

Wednesday evening I went to a craft night that one of my college roommates has every month. This month we made these super cute wreaths out of felt flowers!! I didn't finish mine there, so I figured that I would take pictures of the process and do a tutorial for you all!!


Hilary {my roommate in college} already had all of the felt cut into 5 inch squares for us, thank goodness! {I also had a few 4 inch squares}


So first thing, you fold the square in half and then in half again.


 Then make a rounded cut from corner to corner{diagonally across the non-folded sides}


When you open it up you should have a circle!


Start cutting your circle into a spiral.


It should look like this when you are done.

Next, start forming your flower by hot gluing the tip, and then fold it over itself and start wrapping it around.
 Keep wrapping keeping the back even so that you have a flat surface to glue onto the wreath.

When you get to the end, glue back liberally and place the center of the circle over the back {covering the spiral}

And this is what it looks like!


Once you have all of the flowers made, you just hot glue them to the Styrofoam wreath how ever you like.


I added some straight pins to some of the centers to give it a little interest!!


And, the final product!!!!  L.O.V.E. it!!!

Have a fabulous day!!

Linking up here!
 ~mariah~

Wednesday, February 22, 2012

M.I.A. & Terrific Tuesday {4}

Hello!!  Have you been wondering where I've been?  Well, I was M.I.A. because I got to go spend the weekend with my amazing hubby!!  It was a wonderful weekend!! {Pics coming soon!}

So since I was away from my computer I missed putting up Terrific Tuesday yesterday, but I didn't want to just skip it, so it is just a day late!!


Have a great day!!
~mariah~

Wednesday, February 15, 2012

Guest Blogger: Allison Brooks

I am so happy to have another article from a guest blogger! Allie is the mastermind behind her new blog Musings of a Curious Mind.

Valentine’s Day DIY Projects for Military Families


For military families, deployments and separations are often a regular and challenging occurrence. Two of the most essential tasks during a separation like this are supporting the service member and keeping the family connected. Here are some simple ideas the spouse and children at home can do to show support for the deployed service member and help the family stay as connected as possible during the separation. Theses fun and simple crafty creations can help bridge the long distance and bring the family closer together.

Photo Album or Scrapbook

Putting together a personalized photo album or scrapbook for mommy or daddy while he or she is overseas is a great project for kids to do. Older children can take the photos, and younger children can help decorate the pages with stickers. The project can be simple; photos of every day happenings around the house and stickers and markers to decorate the pages. A simple book full of pictures of their spouse and children doing every day things is a great reminder of home.

Notes and Reminders From Home

Before the service member leaves, take a box or container and decorate it with a special theme that is important to him or her. Ideas include branch specific symbols, a favorite sports team, or a hobby. You can personalize it using stickers, paint or even wooden letters that you can glue on to form words. Fill the box with supportive notes from friends and family, pictures of home and around town, and maybe even a scent that will remind him or her of home, like the same air freshener that you use at home. Children can get involved by writing notes or drawing pictures, and by helping to decorate the box. Send the box with your service member and tell him or her to open it when they get there. The supportive notes and other reminders of home will comfort him or her while he or she is far from home.

Themed Boxes

Whether it is for a holiday or for no special reason, send a unique care package with a special theme. A Valentine's Day care package can be decorated with red and pink heart stickers or colored on with red and pink markers. The children can all make special Valentines with notes or pictures. Let the kids pick out candy that will not melt in the mail. You might also create a special video message of all of the family members to include in the package.

What you make and send your service member will be highly personal and depend on the needs and preferences of your family and service member. The most important part is to make what you send personal and show your service member you are thinking of and supporting him or her.


Thank you Allie for the article, and good luck with your new blog!!


~mariah~

Tuesday, February 14, 2012

Terrific Tuesday {3}

Happy Valentine's Day!!! I have sick kids, so sorry for getting this up so late. Hope you're day is fabulous!!


~mariah~

Friday, February 10, 2012

Bye Bye Frumpy Friday {3}

I have done even better this week at "getting ready" for the day!! It is amazing how much doing your hair and makeup, and putting on a cute outfit can do for your mood!! I definitely feel better about myself/life when I have taken the time to make myself cute!!

I didn't take a pic on Saturday.

Sunday--Went to church, so I wore a dress! {of course!}
            I L.O.V.E. this dress, but from the neck up could use some help!!


Monday:  Had a meeting.  Pretty much just comfy, and threw a scarf on to jazz it up a bit!

Tuesday--No pic.

Wednesday--Just stayed home, cute and comfy!


Thursday--Went out to lunch with a friend/fellow military wife, and then to dinner and bowling for another friend's birthday!  Cute outfit, and had a rockin' hair day!!!! {even though I just wore it curly}


Friday--Hung out at my mom's, and made sugar cookies with a friend!  Cute and comfy!


I am a fan of jeans, if you couldn't tell!  I pretty much wear jeans everyday except Sunday!!

{I tried to change up the poses a little!}


~mariah~